By my reading of the instructions I assembled the pilot fairings by holding them
 in
place to align the bottom faces. I used double sided tape on a firm surface to do
that then ran CA glue into the joins. That worked fine until I offered them up to
the pilot beam and found that the bolted strips at the top of the fairings were way out of
line from one side to the other. Yep - the left and right side castings on both sets
were not quite the same depth. I slit the join on one side of each set and
repositioned them again using double sided tape over the edge of a piece of styrene and
with the top edges aligned straight whilst I bonded them with CA glue. As can be
seen from the photo at the right there is some excess depth to be taken off the left hand
casting. Ideally I should form four slots in the centre section. It was too
fiddly to attempt before assembly to this stage but I think will now be a firm enough
assembly to attempt that after I have cleaned up the lines of the three castings to better
integrate the various angles.
in
place to align the bottom faces. I used double sided tape on a firm surface to do
that then ran CA glue into the joins. That worked fine until I offered them up to
the pilot beam and found that the bolted strips at the top of the fairings were way out of
line from one side to the other. Yep - the left and right side castings on both sets
were not quite the same depth. I slit the join on one side of each set and
repositioned them again using double sided tape over the edge of a piece of styrene and
with the top edges aligned straight whilst I bonded them with CA glue. As can be
seen from the photo at the right there is some excess depth to be taken off the left hand
casting. Ideally I should form four slots in the centre section. It was too
fiddly to attempt before assembly to this stage but I think will now be a firm enough
assembly to attempt that after I have cleaned up the lines of the three castings to better
integrate the various angles.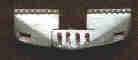
Well, I tried that but the tendency for drills to wander in white metal and the thickness of the casting suggests this is not a good idea! This picture shows how far I have got in drilling out a pilot and beginning to open up the slots. I'm not confident I will be able to complete the job in a satisfactory way. My choices are (a) to persevere in shaping the white metal, or (b) fill in the slots and smooth them off to an 'as delivered' plain sheet pilot, or (c) make new centre sections out of .005" brass sheet, cut out most of the centre casting and apply the brass in its place. I'm trying (c) as the preferable way to go. .005" brass will have a fine scale appearance so long as I can cut the slots cleanly and evenly. I will attempt this by sandwiching the shim between two pieces of thicker brass, soldering the edges and working on the 'sandwich as if it were a single piece of thicker brass. By putting two shims in the sandwich I will be able to make the centre sections for both ends at once.
The plain sheet centre section would be right for 1955. I said at the outset that I wanted to model 5623 as running in 1956. By August 1956 a photo says that she had slots. The story goes that the plain pilots built up a vacuum behind them which interfered with the cooling of the traction motors and the slots were cut early in their life to overcome that.

The shim brass centre panel with slots formed in it seems to have been the way to go. It has a look of finesse about it and the straight front edge (instead of the vee shape) conforms better to photos I have access to. So 5623 remains in the late 1956 time zone. Cool!